Tuesday, 13 August 2013

Time to Sew

Perhaps a better title for this would be "No Time to Sew!" In today's society, when it's possible to be busy 24/7, it's sometimes hard to fit in time for things we love to do. Work and family can swallow up even our "extra" time.

Still, it's important to our mental health for us to have a bit of time we can devote to doing something we love. The old saying had it "All work and no play makes Jack a dull boy." (Of course, all play and no work can have even more disastrous results, but that's another story.)

If costuming is your love, you won't be able to bring a huge sewing project with you wherever you go. It's impractical, and people will give you suspicious glances. However, one overlooked aspect of costuming is accessories. Some of these are highly portable, attract favorable rather than displeased attention, and will get your costume farther along. Here are some suggestions:

Lace handkerchiefs.

  • Whether or not you make your own lace, you can bring a small square of linen with you. The rest of your supplies will include either pre-made lace and a needle with matching thread, or, if you're a tatter, a tatting shuttle and reel of cotton. 
  • Handkerchiefs were an important part of life before the invention of facial tissue, and whether or not  you use it according to its original purpose, your outfit will be more complete with a "hankie." Be sure to match the style and size of lace to your costume period and Sumptuary Laws, if they exist in the time frame. Some earlier reenactment periods don't allow for lace.

Lap quilt.

  • You can't bring a huge quilting frame with you everywhere you go, but you can bring a quilting hoop to work on individual squares that you can sew together later. Georgia Bonesteel's excellent books and programs on the concept of Lap Quilting changed the way a lot of people quilt, including me! 
  • It may seem counterintuitive to say you can have more time for quilting if you hand-piece rather than sew by machine, but if you have little time to sit down and sew and lots of time when you're having to wait for something (say, in a doctor's office, at the garage getting your car repaired, etc.), it can be an easy way to get time to quilt into your day! 
  • Even if you machine piece the top first, you can still bring individual squares with you to hand-quilt with a relatively small quilting or even an embroidery frame. 
  • The added benefit of hand-piecing is that you can bring it safely to a reenactment without fear of modern techniques being ridiculed by the purists.
Gloves.
  • Gloves are appropriate in many time periods, and are small enough to work on while on break, in a waiting room, etc. 
  • Gloves can be hand sewn of fabric or fine glove leather (which will be very thin and pliable). 
  • Gloves may also be knitted or crocheted. I've even tatted gloves, though it's more of a challenge and not for beginning tatters. A combination of techniques may be used. I haven't tried hairpin lace yet, but I'm sure it could be beautifully combined with other needlework to make amazing gloves.
Socks and stockings.
  • If you're truly adventurous and a good knitter, you can bring a sock or stocking pattern with you, along with the appropriate needles for knitting in the round.
  • Silk stockings can be cut out of the silk at home and then hand sewn, which could be done anywhere. 
  • You can embroider "clocks" onto silk stockings that haven't had their back seam sewn yet, and have an appropriate and much less expensive addition to your 18th Century costume.


Scarves, shawls and cravats.

  • Scarves and shawls have gone in and out of favor over the centuries, but for those time periods where they are popular, they make a great accessory.
  • A scarf can range anywhere from 14 inches square (roughly 35.5 cm) to the long, narrow versions in favor with early twentieth century pilots.
  • Shawls vary in shape and size from the very small (which can sometimes mimic a Bertha collar) to ones large enough to wrap around you twice. 
  • Cravats should be of fine, crisp linen, which you should cut outwoven or sewn.  beforehand and then can hem using the rolled handkerchief hem technique. 
  • Scarves and shawls can be knitted, crocheted, 
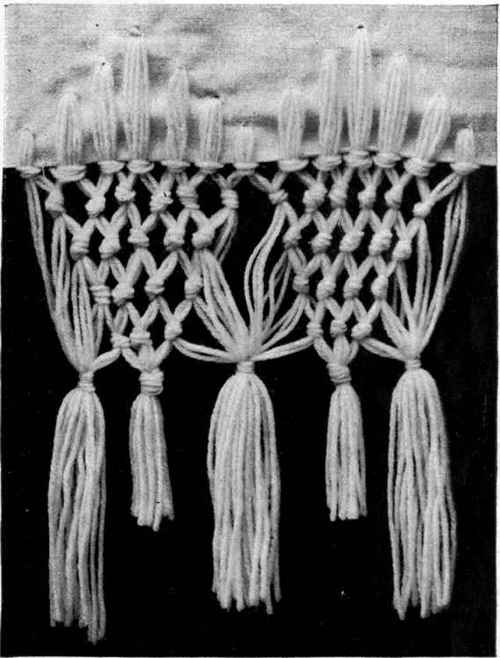
  • A popular pastime in the Georgian and Regency periods in England was "knotting a fringe" for shawls. This was macrame, pure and simple, and could be a small enough project to carry with you. The original fringes were most likely of silk. While the cost would be prohibitive for many of us, rayon threads would make an acceptable substitute. 
I'm sure there are other accessories one could make that have small enough parts to bring along with you. I didn't mention beadwork, because if the beads get away from you in a crowded room, you'll never manage to recover them all! Any kind of jewelry making is also best done at home or in your workshop, if you're blessed enough to have one. 

I hope today's blog will inspire you to find something portable to work on while you're away from home, or while you're at home entertaining company. Who knows, your friends might like to join you in starting a small project of their own! 

Tuesday, 12 February 2013

Fabrics, Part 1

The very earliest "fabrics" were skins and furs. I'll write more on those later, as the methods of their preparation is vastly different from other fabrics.

The fabrics of first handmade manufacture are the woolens and linens, so ancient that they are mentioned in the Bible. Cotton cultivation came later, along with silk, which, due to the difficulty of obtaining it during the Middle Ages, became very popular among the royal, noble and wealthy merchant classes of Europe.

Wool is sheared from living animals, especially sheep, goats (cashmere), camelids (camel, alpaca, llama, etc.), and musk oxen (quiviut). Primarily, however, the term "wool" refers to fibers sheared from sheep. (See below for a discussion of the "other" wools.) Sheep's wool is easily dyed, another plus. One of the earliest methods of forming fabric from wool is felting, where the wool is washed in hot water with some sort of soap and then rubbed by hand until the fibers mat together. Modern methods achieve this with machines, but you can still make your own felt today, either by using wool fabric or natural wool fibers.

Linen is made by gathering the stems of the flax plant, then soaking them until they swell. The process is called retting. Once the fibers are free of the outer stalk, they can be dried and woven. No good modern method of creating linen has been successfully developed, which is one reason why linen is so expensive.

Cotton is another ancient fabric, which, unlike linen, was made both in the Old World and the New. Harvesting used to be a time-consuming process, as did removing the seeds from the fluffy fibers of the pod. Eli Whitney's invention of the cotton gin, to remove the seeds by machine, greatly simplified the process, reducing the cost in the 19th Century.

Silk, according to legend, was discovered when a silkworm cocoon dropped into the teacup of a Chinese princess. If true, she must have been amazed at the long, lustrous, single thread she was able to unwind from cocoon. History records that the Empress Si-Ling-Chi was raising silkworms by 2640 BC. The only insect-produced fiber has many different variations in the weaves, one of the most popular of which is silk satin.

Ramie is another natural fiber, sometimes called China grass. It behaves somewhat like linen. Nowadays, it's often blended with other fibers, notably cotton and silk.

The "other" wools come from a variety of fur- or wool-bearing animals. Goats give us mohair and cashmere. Camel hair comes from (of course) camels. Other members of the camel family provide alpaca, llama, guanaco, huarizo and misti (crosses between alpaca and llama, the camelid versions of a mule and a hinny), and vicuña. Angora comes from angora rabbits, which are clipped just like sheep, only much more frequently. (No harm comes to the angora rabbits!) Quiviut is taken from the soft underwool of musk oxen.

Depending on your costume time period, you may choose one or more of the fabrics made from these fibers. In a future post, I'll also discuss historic fabric blends (such as linsey-woolsey). In the meantime, while you're doing your research, I recommend the following books:
Claire Shaeffer's Fabric Sewing Guide
Fabric Science, Fifth Edition
A History of Costume

Tuesday, 5 February 2013

What's the Bane of Your Costuming Existence?

I don't know about you, but mine is polyester thread! Sure, it stretches, which makes it great for things like swimsuits and exercise garments. The only problem with it is this:

It's stronger than the authentic fabrics we love to use in costuming! That means if you're experiencing problems with a seam being too tight, the thread won't break. The fabric will tear! Naturally, you don't want that to happen.

Unfortunately, finding 100% cotton, linen and silk threads can be difficult. They also cost more than 100% polyester or cotton-wrapped poly threads. However, it's worth paying more if your costume lasts longer, especially if you're planning to get several years of service from it.

If you're looking for 100% cotton thread, some manufacturers include

  • Coats of Coats & Clark fame (who manufacture the aforementioned cotton-coated poly thread, which is great for many applications but not 100% natural fiber sewing)
  • Gütermann, who also have a line of other natural and artificial threads
  • Mettler also produces cotton threads along with their polyester Metrosene thread
Some of these also manufacture 100% silk thread. 
If you're looking for a good source of linen thread, try Lacis. They also carry silk and cotton threads, plus a goodly number of sewing and needlework accessories, many of which will be appropriate for your reenacting activities. 

So, what's your pet costuming peeve? Please feel free to share it here! I'd love to hear from you!

Friday, 1 February 2013

Ways to Get Into Costume

Once you have your costume era and silhouette firmly in mind, there are several different ways to achieve your desired look. Each has its merits, so don't dismiss any of them out of hand until you've explored the options.

  • Pre-made costumes. These are available from costume shops and internet costume sites. Prices vary greatly according to quality, materials used, amount of handwork involved, and country of origin. The more it costs to make, the more it costs to buy.
  • Costumes from a dressmaker or tailor. Here you'll pay the going rate for the sewing provider, and for all materials, including any patterns necessary. 
  • Costumes you make yourself from a purchased pattern. Several pattern companies make costume patterns. In a future blog post, I'll discuss those in more detail.
  • Costumes you make yourself from a book containing patterns to enlarge.
  • Costumes you make yourself from a pattern you develop, either by flat drafting or draping.
If you don't have a single craftsy bone in your body, obviously your best bet will be to buy a costume, either premade or custom made. Premade costumes come in certain sizes, just like regular garments, so you won't have as much choice of how it fits you, unless you have it altered to fit, which can add more money onto the project. 

If you love to sew and make things, however, you should plan on making at least part of your costume. Depending on your skill level, you can come up with something quite wonderful.

And if you're terrible with a sewing needle, take heart. Not every outfit worn by our ancestors was perfectly sewn! Plaids weren't always perfectly matched at the seams. Seams weren't always perfectly straight. Perfection actually can detract from the historicity of an outfit, so feel free to make mistakes. 

Tuesday, 15 January 2013

Style is in the Details

Hello again! By this time, you've probably chosen the time frame you wish to reenact or a historical style that appeals to you. Great! Let's move on.

Styles change, sometimes slowly (as in the Middle Ages), sometimes at supersonic speed (as happened in the late Twentieth Century). Sometimes the entire silhouette of a fashion changed. Other times, only the details changed.

The first detail is overall shape (the silhouette). This can range anywhere from straight up and down (e.g., caftans, Regency round gowns, 1920's flapper styles, 1960's mod) to highly shaped and formed (Tudor period, most of the mid-to-late 1800s). Some of these silhouettes are more suited to our shape than others, so we need to be honest with ourselves if we are choosing a time frame based on personal inclinations rather than a group effort.

The second largest detail is materials: fabric, leathers, furs, feathers (don't panic if you are anti-fur! Some modern synthetics will give you just as good a representation as the real thing), lace, and other trimmings.

These two things taken together can greatly affect the appeal of a garment, and slight changes can make a big difference!

If you are making your own costume, you can choose as you like. My one recommendation is that if you want a style from before the invention of rayon (known at the time as artificial silk, manufactured in the USA by the American Viscose Company in 1910), do your best to use natural fibers. Each historical period had preferred fabrics, and each strata of society had access to differing levels of quality, so that should also affect your decision.

Believe it or not, the cost of manufacturing homespun these days has driven the prices much higher than equivalent natural fabrics woven in mills. For those of you who remember "Little House on the Prairie," the cost of those "homespun" dresses Mrs. Ingalls wore was astronomical, due to the unavailability of "real" homespun, necessitating the use of coarsely woven silk! (Or so I've heard.)

So, if you choose to portray a peasant, be aware that your costume may cost more than a nobleman or -woman's garb!

That's it for today. More on fabrics next time. Any questions about costuming? Please feel free to ask!

Tuesday, 8 January 2013

Finding Your Costume Style

If you're in a group of historical reenactors, you probably have already found your costume style. The group will set the time frame into which your costume must fit, give or take a few years (or possibly decades). One important thing to remember if you're going to take liberties with the time frame in a historical context: always go back in time from the time frame, not forward. Your historical character might like to wear garments from an earlier generation, but they certainly can't wear something that hasn't been invented yet!

Here's an example. Say your group reenacts the Civil War, circa 1864. By that time, the crinoline and hoops had begun to gravitate away from the circular mode of the previous decade, toward the back of the dress. While those who could afford it probably adopted the new design immediately, those of lesser means or whose information about fashion was limited to what could be smuggled through enemy lines still wore the round crinolines. Shoulders were still sloping and the sleeve beginning on the upper arm rather than the shoulder line, but the fashion was changing ever so slightly.

Another example: During the Tudor period, the earliest wide skirt used the Spanish farthingale, which belled out much like the later hoop skirts of the 1860s, though in a straighter line from waist to floor. Successive fashion mania went through wide farthingales and even into the wheel. However, only those at Court followed fashion religiously. Changes in style took their time making their way down through the echelons of society.

"But I'm not in a group!" you say. "I just want to do something I'll like."

Great! Time is your oyster, to paraphrase a thought. You have all of history at your disposal. Look through books on costume history, browse images on the web, find what you like. If you simply want to add a few period touches to your everyday clothes, you can!

You can choose designs that will make the most of your shape, no matter what it is.  If you're especially slender, early Regency dress may appeal to you. Muscular man? Try adding a little Norse to your outfit, or some Wild West. Not enough to look costume-y, but enough to give you the satisfaction that you look different from the rest of the herd without looking ridiculous.

In the end, only you can decide your costume style. You may find more than one historical period appeals to you. If that's the case, you can mix it up as you please. I love lots of different historical periods and styles.

Which one is your favorite? I hope you'll share it with us here!


Monday, 31 December 2012

Happy New Year from Goodly Raiment!

This blog has barely begun, and I'm awaiting the New Year with great anticipation. I did a lot of creative crafting and sewing in 2012, including developing patterns!

In the New Year, I plan to discuss more costume history, but I also want to share how to make patterns for various types of things, including garments.

Nightshirt: front view
To begin, let me share with you some photos of a piece I was commissioned to make for Christmas: an Old West-style nightshirt. I've made Old West shirts before, but never a nightshirt.

Looking for nightshirt patterns was a nightmare! The few things I could find labeled nightshirt were all too short for the comfort of the man whose present this was to be. And none of them had the kind of detail I wanted. Most of them had either modern collars, or, worse yet, no collars at all! What I really wanted was a band collar.

Nightshirt: back view
After searching pattern catalogs in vain, I did some research and decided to develop my own pattern. Basing it on drawings of Old West shirts I'd seen in various places, I created a nightshirt pattern that would be long enough to come about mid-calf on its intended recipient.


This nightshirt included a lot of firsts for me:
Nightshirt: collar detail showing matching plaid across front

  • First time working with flannel 
  • First time matching plaids
  • First time matching a pocket design to a shirt front
Matching the plaid was probably the biggest challenge. Making sure I had the fabric in the correct direction was another. As you can see from the design, the NorthWoods fabric has the animals both right side up and upside down. That created its own challenges. To make matters more difficult, the animals placement didn't repeat on closely spaced regular intervals. They were much farther apart in their order than was apparent on first inspection.

Nightshirt detail showing pocket & cuff
Another challenge was matching the pocket to the shirt fabric. My first effort failed miserably! In order to be sure I had it correct, I had to create a transparent pattern piece, so I could see where the animals were. Can you see where the pocket is in the photo? It's right above the cuff. When you look inside the pocket, it's the same as outside! 

I really enjoyed shopping for the fabric and buttons for this shirt. Finding buttons that have the look of animal horn was a delightful surprise. The flannel is lovely and soft, and, best of all, the recipient and commissioner were both pleased with it!

Check back often for details on how to develop pattern ideas and make your own patterns, as well as get ideas for your own garments and accessories!


Is there anything you want to see in the Goodly Raiment blog in the New Year? How about in the Goodly Raiment Etsy Shop? I'm open to suggestions. Please post them here, and let me know what you'd like to see!

Thanks! Have a wonderful & healthy 2013!